Watery Desktop 3D will animate your wallpaper with water effects, such as waves and rain. It will also work as a screensaver which floods your screen, you'll see how everything on your desktop will sink into water. This product works on Windows 7, Windows Vista and Windows XP.
To change blog template please follow the following steps
Steps for installing default blogger templates 1) After login to your blogger account go to
Dashboard > Layout > Pick new template
Then you can choose from available templates on blogger.com and click Save template.
You need to save widgets before doing this as mentioned below.
Steps for installing third party blogger templates 1) Suppose you want to install some other third party template which is not on blogger website.
Then you can download the template you like from the website and can save that template on your hard drive .
2) Then you need to backup your original template first. For this from Dashboard go to > Layout > Edit HTML > Download full template > choose save to disk and save it on your hard disk.
This backup is helpful if anything goes wrong with new template.
3) Now when we change template , the widgets are lost .Widgets are your added page elements like visitors counter , html script , link list etc. So you need to download code of each widget properly name it and save it with notepad as a text file. To copy code of each widget you need to go to Page elements then edit and you can view the code of respective page element which you can copy and then paste in Notepad.
4) Now go to Dashboard > Layout > Edit HTML > Browse
Choose saved template from your hard disk and click Upload.
This will give you warning for widgets to be deleted.
Then you can continue with save template.
Your new template is installed , so view your blog and check it
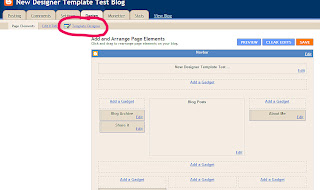
5) Now start installing each widgets you have saved earlier by going to Page Elements > Add a Gadget.
It is easiest to start off with changing your template to minima. However, keep in mind changing your template to minima will erase any tweaks you have made to your blog's html code.
Go to Template, Edit HTML.
Now, find this section in the HTML code:
#sidebar-wrapper { width: 220px; float: right; word-wrap: break-word; /* fix for long text breaking sidebar float in IE */ overflow: hidden; /* fix for long non-text content breaking IE sidebar float */ }
Copy this entire section and paste it directly below itself. We are now going change the elements I have highlighted in red to the following:
#left-sidebar-wrapper (this makes the css for this section unique) float: left
Scroll up a little bit until you see this code:
#main-wrapper {
width: 410px;
margin-left: 25px;
float: $startSide;
word-wrap: break-word; /* fix for long text breaking sidebar float in IE */
overflow: hidden; /* fix for long non-text content breaking IE sidebar float */
}
Add the words you see in red.
Now, we are going to adjust some of the numbers. Change the numbers on your blog to reflect the highlighted numbers below.
#outer-wrapper {
width: 880px;
margin:0 auto;
padding:10px;
text-align:$startSide;
font: $bodyfont;
}
#main-wrapper {
width: 425px;
margin-left: 25px;
float: $startSide;
word-wrap: break-word; /* fix for long text breaking sidebar float in IE */
overflow: hidden; /* fix for long non-text content breaking IE sidebar float */
}
#sidebar-wrapper {
width: 200px;
float: $endSide;
word-wrap: break-word; /* fix for long text breaking sidebar float in IE */
overflow: hidden; /* fix for long non-text content breaking IE sidebar float */
}
#left-sidebar-wrapper { width: 200px; float: left; word-wrap: break-word; /* fix for long text breaking sidebar float in IE */ overflow: hidden; /* fix for long non-text content breaking IE sidebar float */ }
Next, hit ‘ctrl F’ and paste this <div id='main-wrapper'> in the find box. Now paste the following code directly above that.
You may want to adjust the header size so it is as wide as your background. Scroll up till you see the following code. Change it to reflect the highlighted text. *By making the border 0px you will not have the border lines around your header!*
#header-wrapper {
width:860px;
margin:0 auto 10px;
border:0px solid $bordercolor;
}
#header-inner {
background-position: center;
margin-left: auto;
margin-right: auto;
}
#header {
margin: 5px;
border: 0px solid $bordercolor;
text-align: center;
color:$pagetitlecolor;
Click save template. Now click on your ‘Layout’ tab. You will need to drag some of your elements on the right sidebar to the left side bar. Click save and preview template. You should now have a 3 column layout!
*When changing out your background you do NOT need to reset your template. This will erase all the coding you just did. Just erase the old background code and replace it with the new one!
Well Blogger has come up with yet another way to add a custom background to our blogs. The good news is, this time it's really easy, and there's NO CODE involved! Yay!!
(You can click on any of the images to see them larger)
Step 1: The first thing really is that you will need to make sure you already have a backgroundsaved to your computer, since you will be uploading it later. You can use any of the ones that I've made from HERE, or you could use your own if you have one.
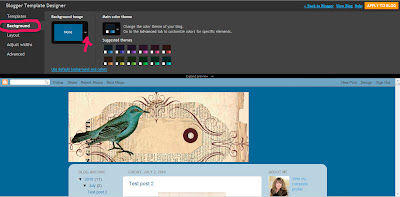
Step 2: Go into your Dashboard and click on "Template Designer" as shown above.
Step 3: Select "Picture Window". You will notice there are 3 options for "Picture Window", use the first one, next to the arrow, is the best option (with the blue sky). Select it by clicking on it.
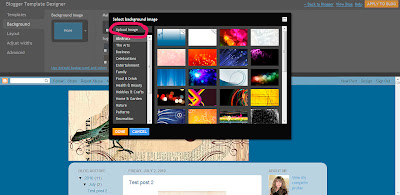
Step 4:Click on "Background" and you will see a screen like the one above. Then click on the tiny white arrow next to the box labeled "Background Image". You will then see a pop up box like the one in the image below.
Step 5: In the pop up box select "Upload Image".
Step 6: Next click on "Browse" and find the background image that you have saved on your computer, and select it. Then click "Done".
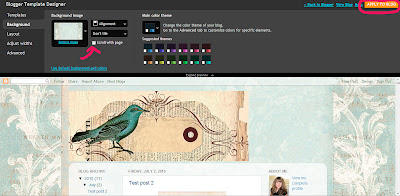
Step 7 - Make sure you deselect the box marked "Scroll with Page". (If you don't do this, your background won't fill the whole page, and it will look yucky!). Then click on "Apply to Blog".
Yay! Your done!!
1. Netframework needed especially to install quicklaunch. 2. The audio must installed manually, you can read
the installation guide i provided, of you still have problems leave
your comments.
ATI Radeon HD 3200 Graphics/Video Driver Download (catalyst version 9.10) - (strongly recommended)
or ( if the driver above didn't work try this) Download
MS UAA (required with a reboot before Audio driver) Download
Java has been called "the vehicle by which developers will be able to bring dynamic application behavior to the Web" . Users can download applets from either local or remote Web servers for execution inside popular Web browsers such as Netscape Navigat or. Applets run disconnected from the server, just like native applications. Java however, has fallen short of its widely ability to connect to outside resources via a build-in API. The first release of the Java Developers Kit (JDK) in early 1995 had no i ntegrated support for accessing databases. The functionality of Java made it easy to build tools for accessing databases, but there was no prescription about how such drivers ought to function. Several vendors produced good tools for database access but t here were no general guidelines for how database access tools should be written.
JavaSoft responded with the first release of the JDBC specification in May, 1996. The advent of JDBC means an end to those shortcomings mentioned. JDBC provides a vendor-neutral, universal framework for vendors to use in building tools that allow clien ts to access databases. The JDBC specification itself is just a collection of interfaces and abstract classes that each vendor must implement to write a JDBC-compliant driver. JDBC promises to database-enable any Java applet or application. It is included in the java.sql.package, which will be part of the Java Developer�s Kit (JDK) version 1.1.
JDBC Functionality
The JDBC API standard defines a set of Java classes required to perform standard relational database operations such as managing database connections, SQL statements, result sets, and metadata. JDBC specification has structural and conceptual similarit ies with Microsoft�s Open Database Connectivity (ODBC) driver, which Microsoft introduced in the 1980s to bring some conformity to client access to databases. It is based on the X/Open SQL Call Level Interface (CLI), the basis of ODBC. Like ODBC, JDBC giv es Java developers a common API to most relational databases, including client/server databases such as Oracle, Sybase, and Informix. The big difference is that JDBC builds on and reinforces the style and virtues of Java, and is easy to use.
JDBC sends a request to a database server using the appropriate SQL dialect and then processes the results (answer set). Using JDBC, it is easy to send SQL statements to virtually any relational database. It means that with the JDBC API it isn�t necess ary to write one program to access a Sybase database, another program to access an Informix database, another program to access an Oracle database, and so on. A single program using the JDBC API can be written, and the program will be able to send SQL sta tements to the appropriate database.
Furthermore, with an application written in Java programming language, the programmer also doesn�t have to worry about writing different applications to run on different platforms. The combination of Java and JDBC lets a programmer write it once and ru n it anywhere. Developers writing database access client applications for heterogeneous networks like being able to write one application that will run anywhere; that shortens the development process and makes application maintenance much easier than in t he traditional C/C++ world.
Like ODBC, the JDBC API uses a driver manager that simultaneously supports multiple database drivers for various databases. The driver(s) can be downloaded with the applet or exist as native drivers on the client, depending on how the security features of JDBC and Java will be implemented.
JDBC is a low-level interface used to invoke SQL commands, and it was also designed to be a base upon which to build higher-level interfaces and tools. A higher-level interface is user-friendly, and is translated into a low-level interface, such as JDB C. Later on I will mention two kinds of higher-level APIs under development on top of JDBC.
In summary, JDBC makes it possible to do three things:
establish a connection with a database
send SQL statements
process the results
The mechanism to communicate with database servers exist as standard Java classes. This ensures that the security features of Java remain and that JDBC code integrates cleanly in Java code. The JDBC API is expressed through several abstract Java interf aces that allow to link to any number of databases. The interfaces are:
java.sql.DriverManager: handles the loading and unloading of the appropriate database drivers required to make the connection.
java.sql.Connection: exposes the database to the developer, representing the connection as an accessible Java component.
java.sql.Statement: provides a container for executing SQL statements using a connection.
java.sql.ResultSet: exposes the data that returns from the database server to the Java application.
Two models for database access are supported by the JDBC API. They are the two-tier model and the three-tier model. The last one is mentioned more generally as a multitier.
The two-tier model
In the two-tier model, a Java applet or application talks directly to the database. This requires a JDBC driver that can communicate with the particular database management system (DBMS) being accessed. SQL statements are delivered to the database, and the results are sent back to the user.
This is referred to as a client/server configuration, in which the user�s machine is the client and the machine housing the database is the server. The database may be located on another machine to which the user is connected via a network.


 (You can click on any of the images to see them larger)